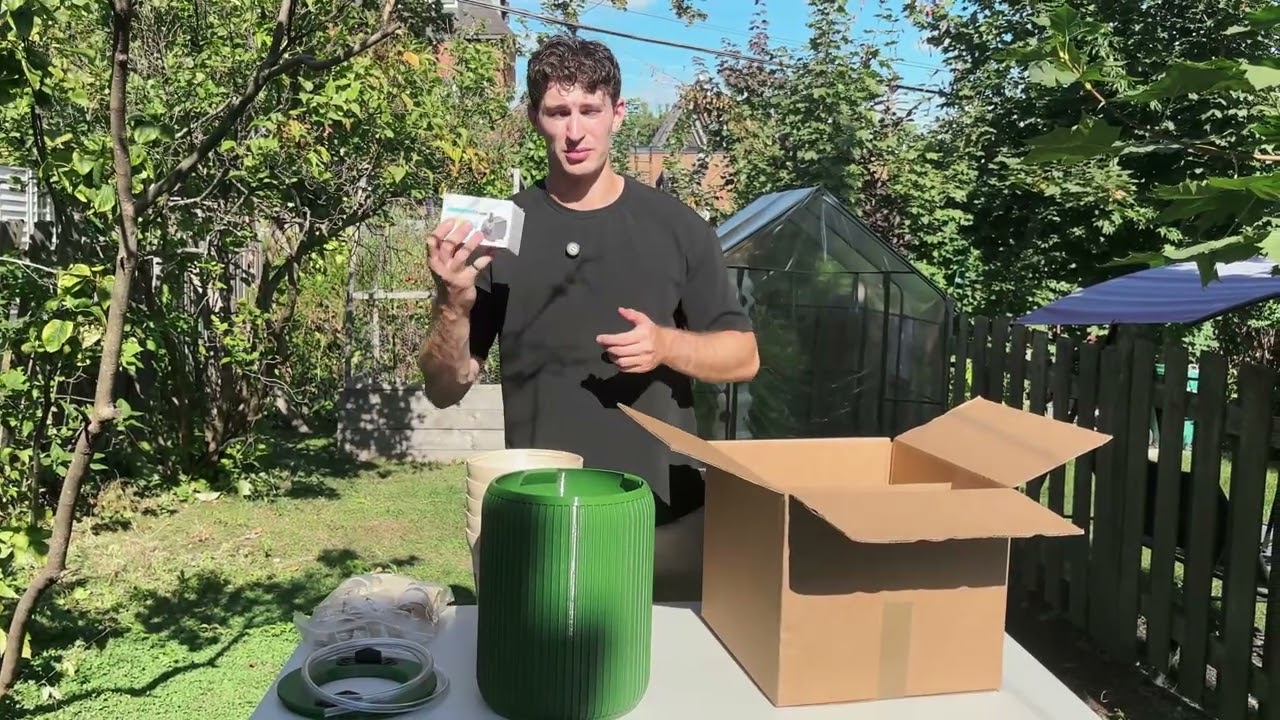
Everything in One Box
What's Included in Your Kit
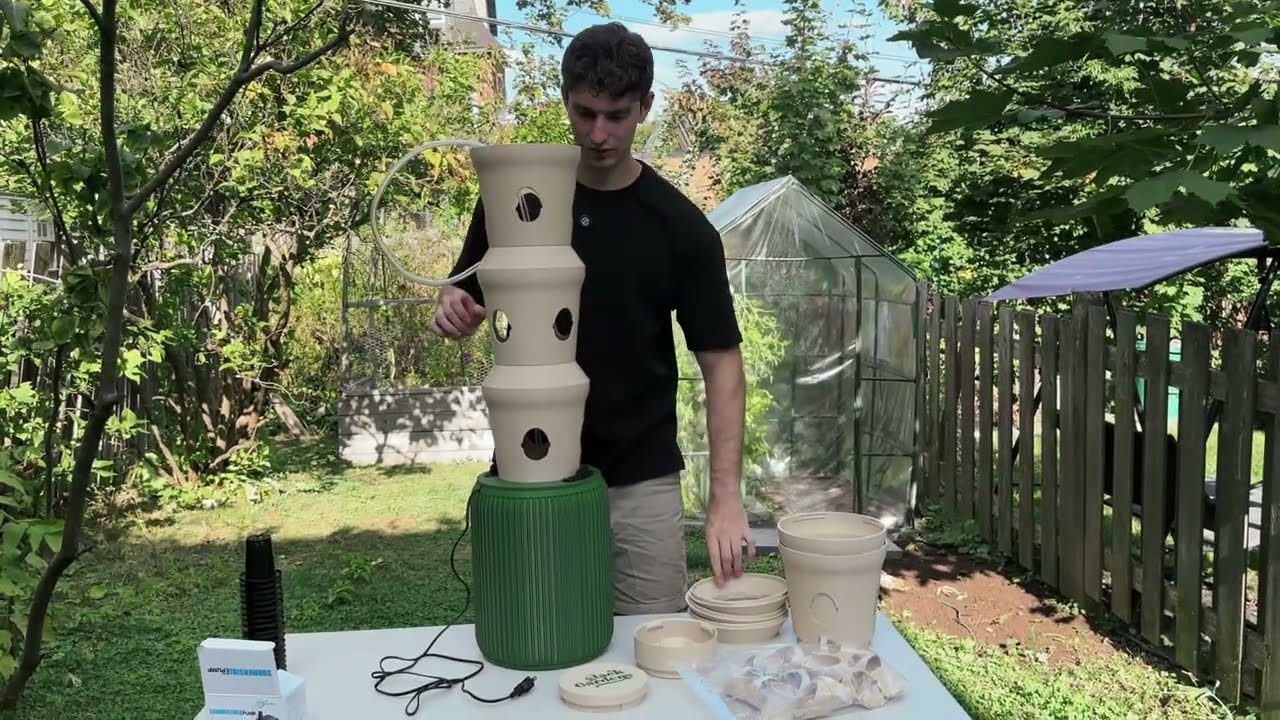
Your kit includes all printed and sourced parts necessary for a full 5-module tower setup:
- 5x ClickFit Modules (each with 4 angled slots for Plant Pods)
- 5x Module Adapters (connect and support each ClickFit Module)
- 1x Top Feeder (distributes water evenly from the top)
- 1x Tower Cap (covers the top of the system)
- 1x Reservoir Base (holds over 3 gallons of water)
- 1x Reservoir Cap (seals the base and routes tubing)
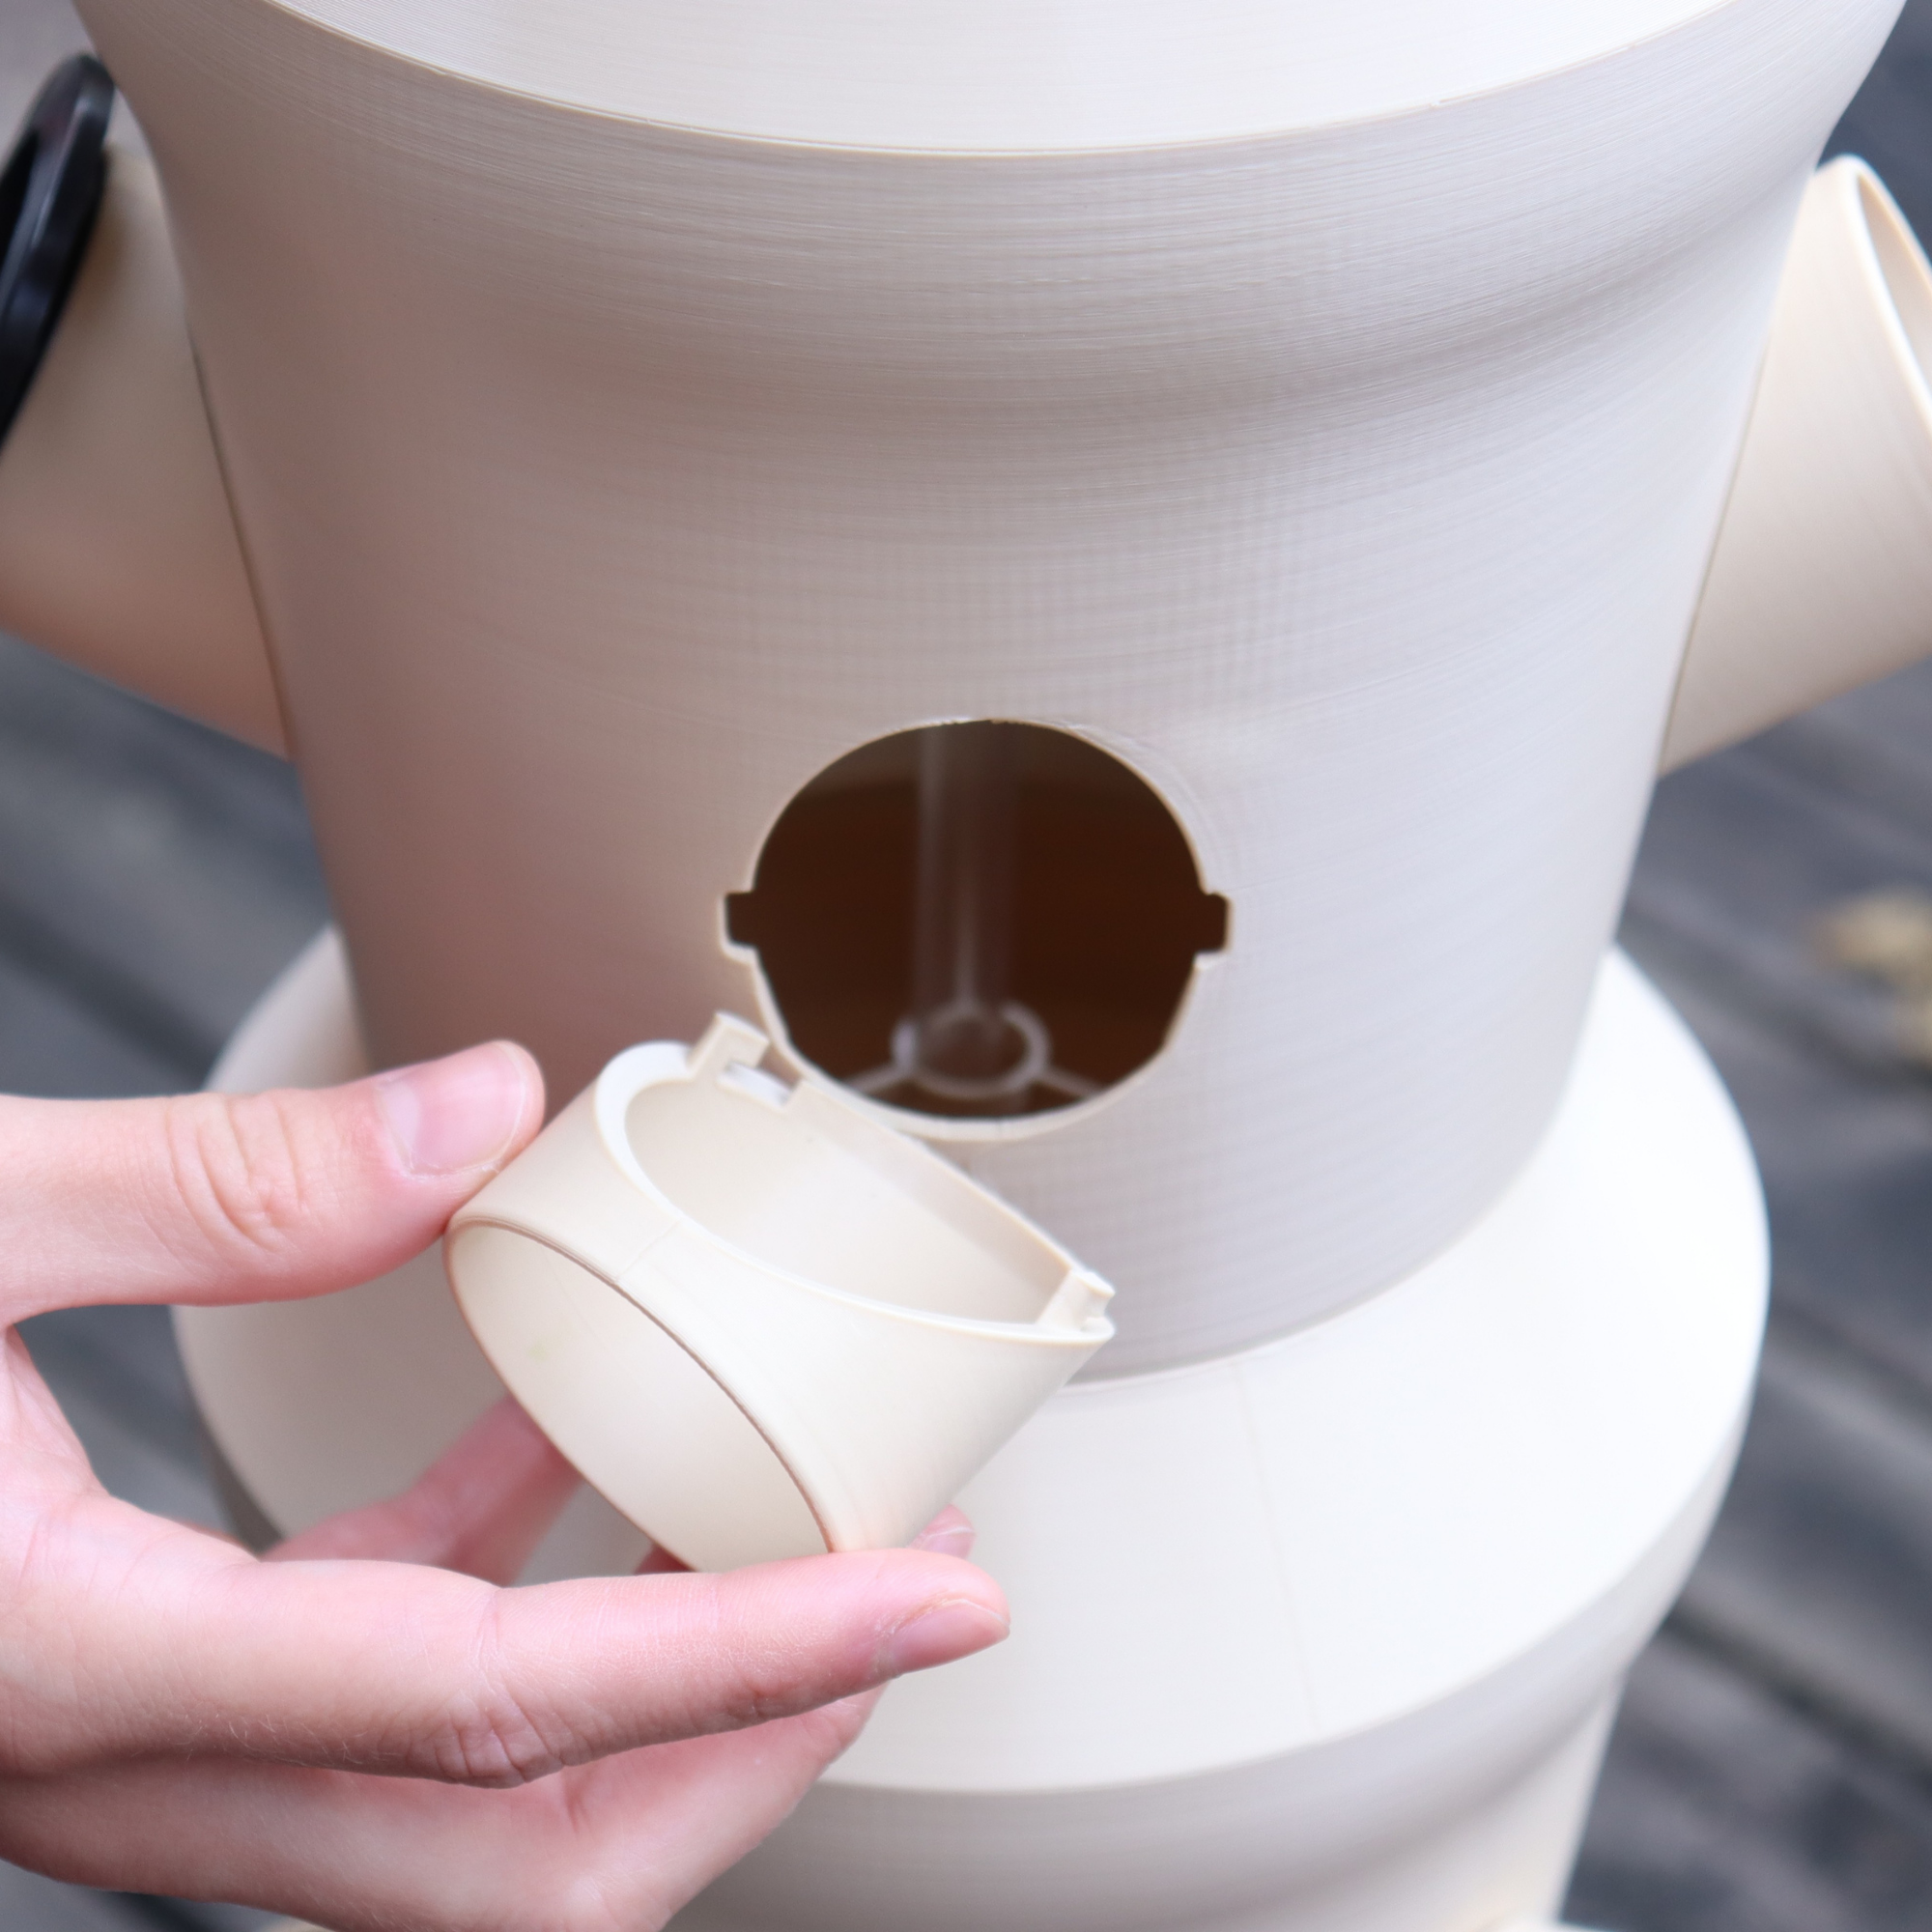
- 2x Drain Plugs (seal the base and allow for easy draining)
- 20x Plant Pod Adapters (snap into the angled slots to hold net cups)
Hardware included:
- 1x 1000L/H submersible water pump
- 1x transparent vinyl food-safe tubing (8mm ID, 10mm OD)
- 20x rockwool cubes (3.5cm x 4cm)
- 20x net cups (70x70mm size)
Your Kit Breakdown
Your Kit Breakdown
Your Kit Breakdown
Your Kit Breakdown
Your Kit Breakdown
Your Kit Breakdown
Your Kit Breakdown
Your Kit Breakdown
Your Kit Breakdown
Your Kit Breakdown
Your Kit Breakdown
Your Kit Breakdown
Your Kit Breakdown
Your Kit Breakdown
Your Kit Breakdown
Your Kit Breakdown
Your Kit Breakdown
Your Kit Breakdown
Your Kit Breakdown
Your Kit Breakdown
Closed Loop System
Excess water drains back into the reservoir, creating a closed, low-waste, self-circulating system.
Water Reservoir
The base holds 3+ gallons of nutrient-rich water.

Circulating Pump
A small pump moves water up through hidden tubing.

Gravity Driven
Water reaches the top and flows downward through the tower.

Nutrient Delivery
Each Plant Pod receives water and nutrients directly at the roots.
It's that simple!
Built to Be Simple
1
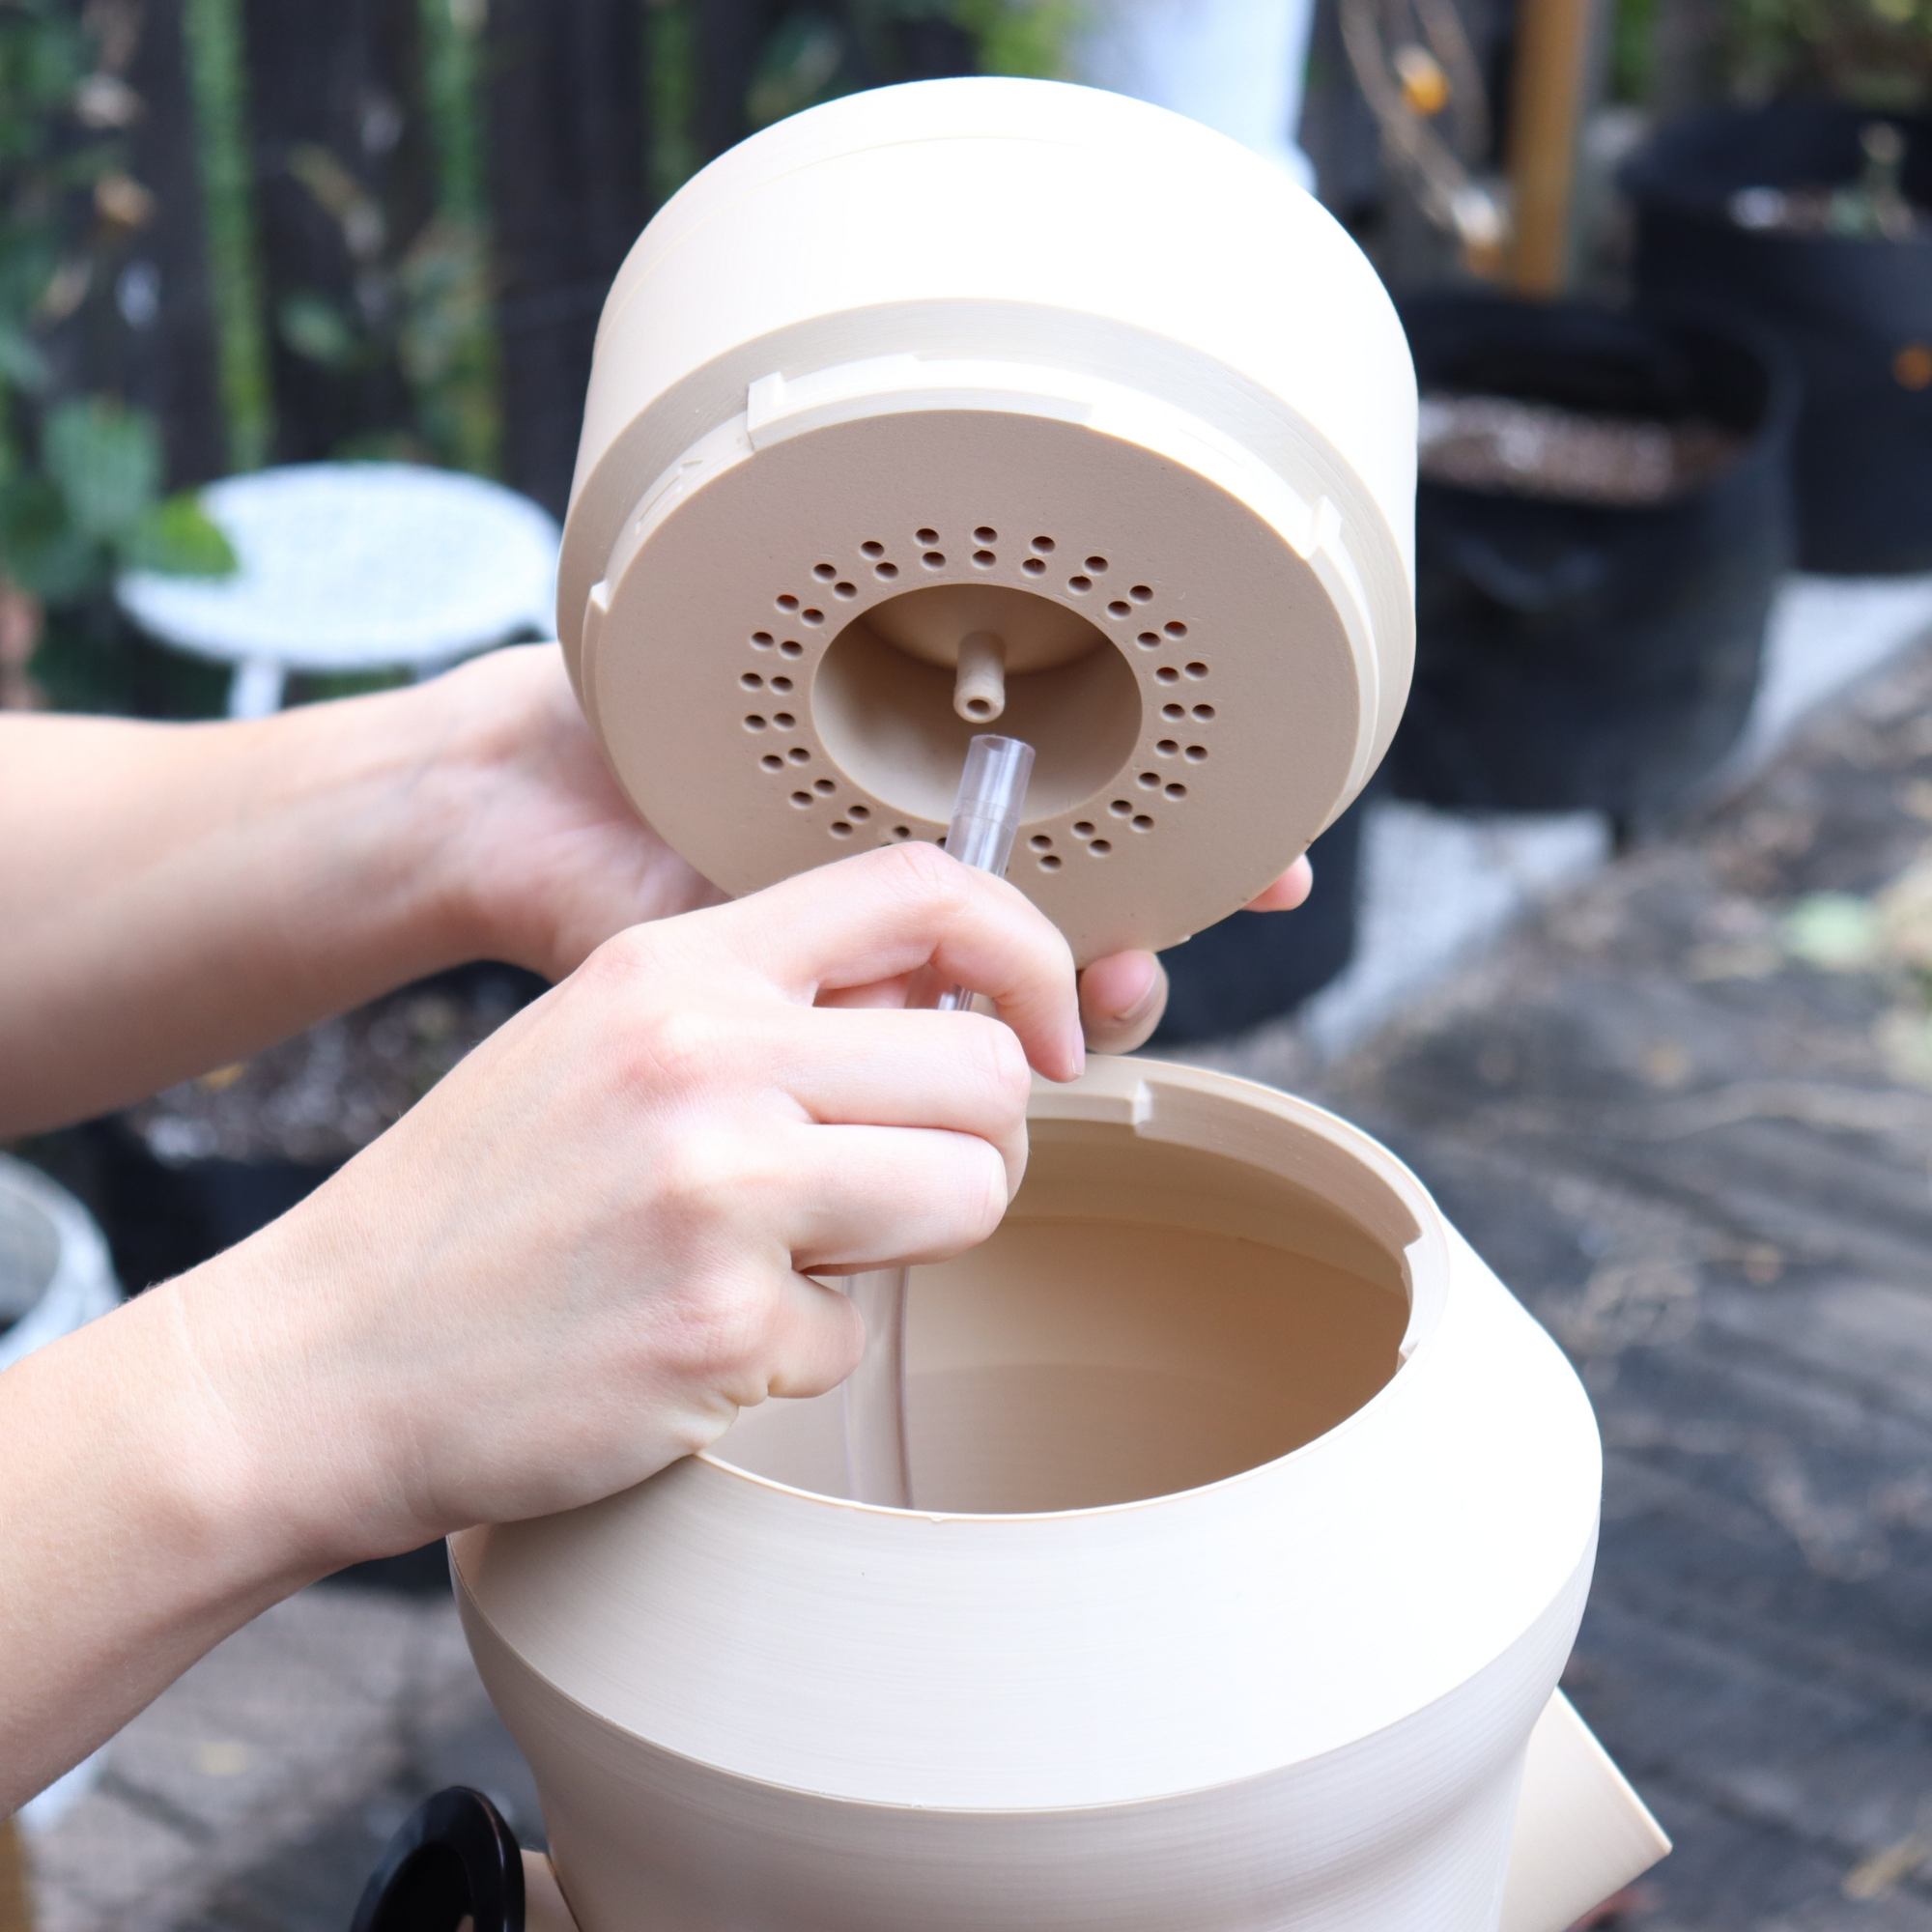
Tower Cap
Protects the system from debris and direct sunlight while giving a clean, finished look.
2
Dispenser
Distributes water evenly across the top tier, ensuring uniform nutrient flow down through the system.
3
Reservoir Cap
Seals the reservoir while allowing tubing to pass through cleanly; designed with cutouts for pump cable and water circulation.
4
Water Reservoir
Holds over 3 gallons of nutrient-rich water and houses the submersible pump that powers the entire system.
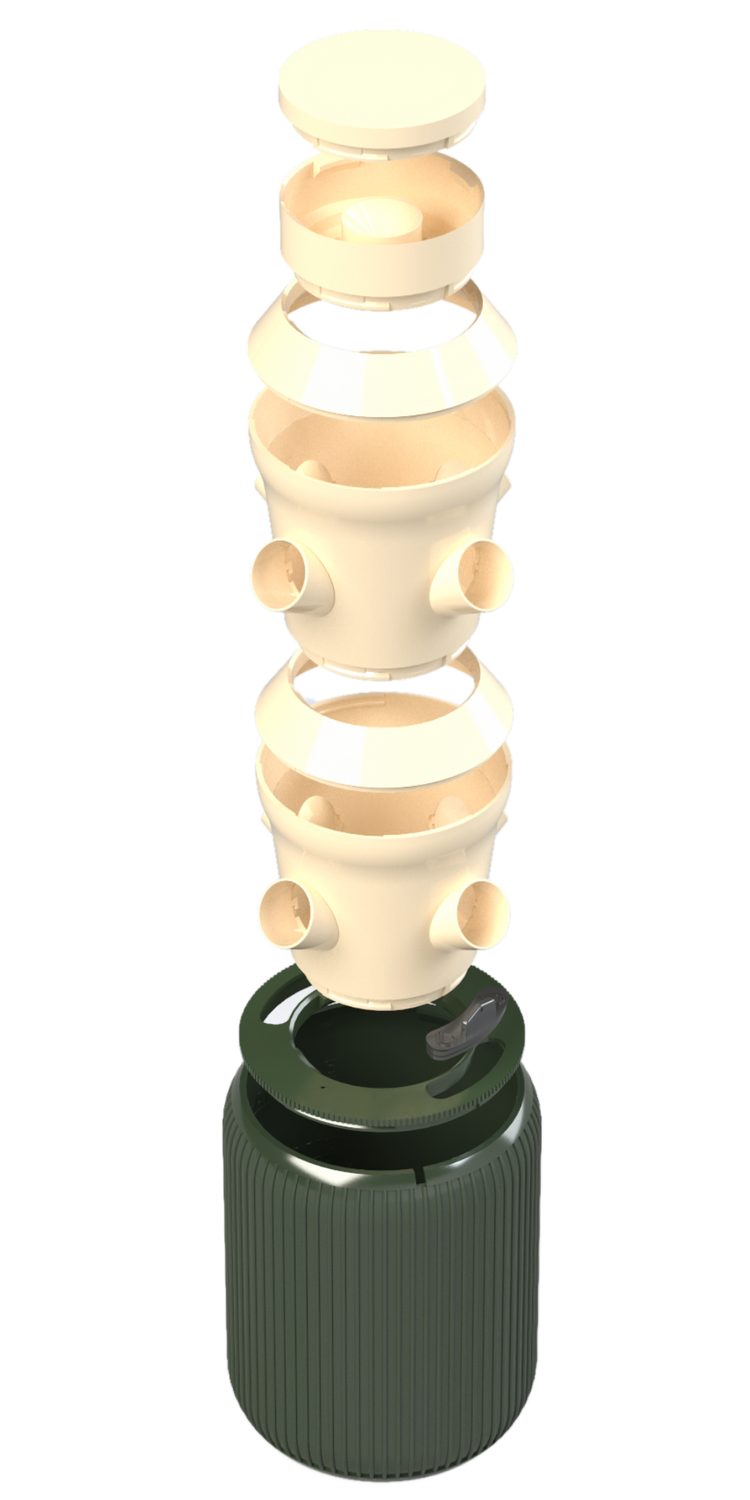
1
2
3
4
5
6
7
8
5
Module Adapter
Connects and locks ClickFit Modules together securely. Sits between each tier to provide structure and alignment.
6
ClickFit Module
Each tier holds 4 plants in net cups and locks securely in place—made from durable, UV-resistant PETG.
7
Plant Pods
70x70mm reusable mesh cups that hold rockwool and seedlings while allowing roots to grow freely into the tower.
8
Water Plug
Two removable plugs make draining and cleaning the reservoir quick and mess-free.
What makes hydroponic growing better than soil?
Hydroponics uses up to 90% less water, grows faster, and avoids pests, weeds, and the mess of soil. No chemicals, no waste—just clean, efficient growing.
How does this system save space and effort?
Its vertical design takes up minimal space and waters itself with ease. No digging, no weeding—just top off the reservoir occasionally and let the system do the work.
Why did we design this system for beginners?
The tower is simple, modular, and plug-and-play. No experience needed—just set it up, add water, and grow fresh food at home. It’s made for anyone to use confidently.
Quick and Easy Setup
Assemble in under 15 minutes—no tools needed, just twist, stack, and plug in.
Prepare the Base
Place the reservoir base on a flat, level surface like a patio stone or deck. Avoid placing it directly on grass or soil to keep the system stable. Fill the base with clean tap or filtered water until it reaches the internal 3-gallon mark.
Place the reservoir base on a flat, level surface like a patio stone or deck. Avoid placing it directly on grass or soil to keep the system stable. Fill the base with clean tap or filtered water until it reaches the internal 3-gallon mark.
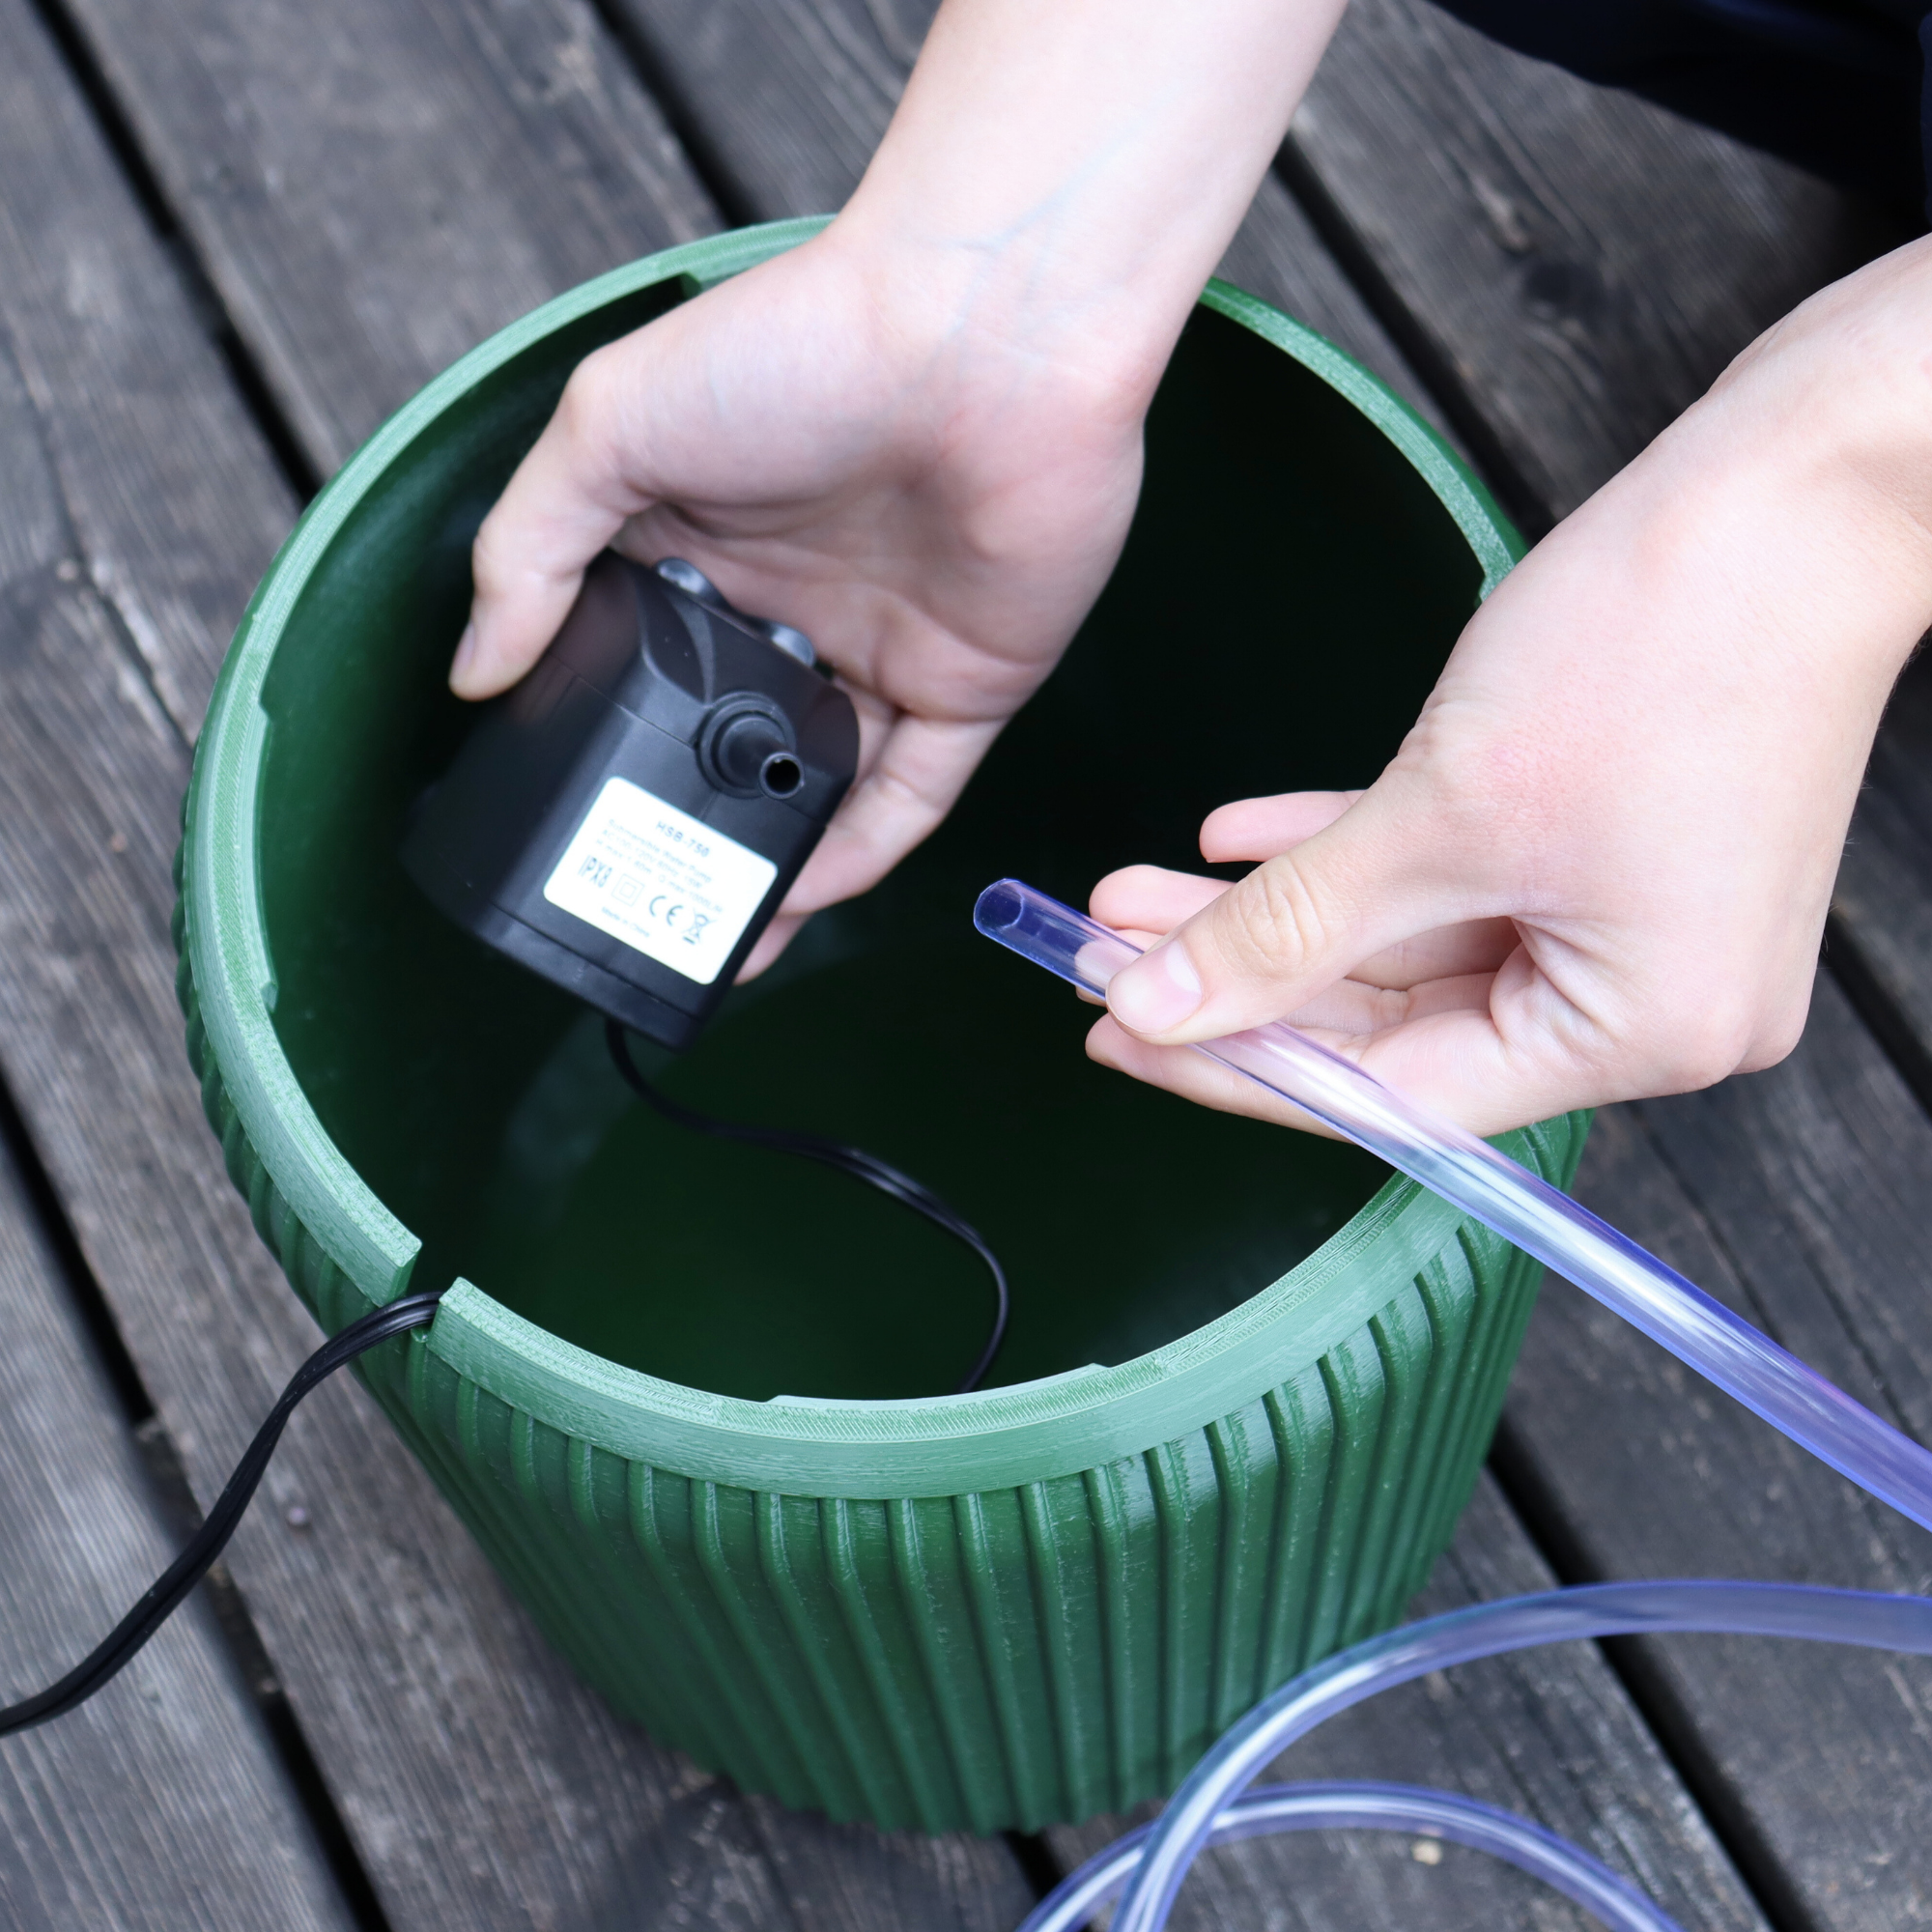
Install the Pump
Lower the submersible pump into the base reservoir and run the power cord through the cutout slot on the side of the base—this allows the lid to close properly. Attach the vinyl tubing to the pump outlet firmly to ensure a watertight connection.
Seal and Cap the Base
Insert both drain plugs into the holes on the reservoir base to prevent leaks. Feed the vinyl tubing up through the large center hole in the reservoir cap (base lid), then twist the lid into place to fully seal the base.
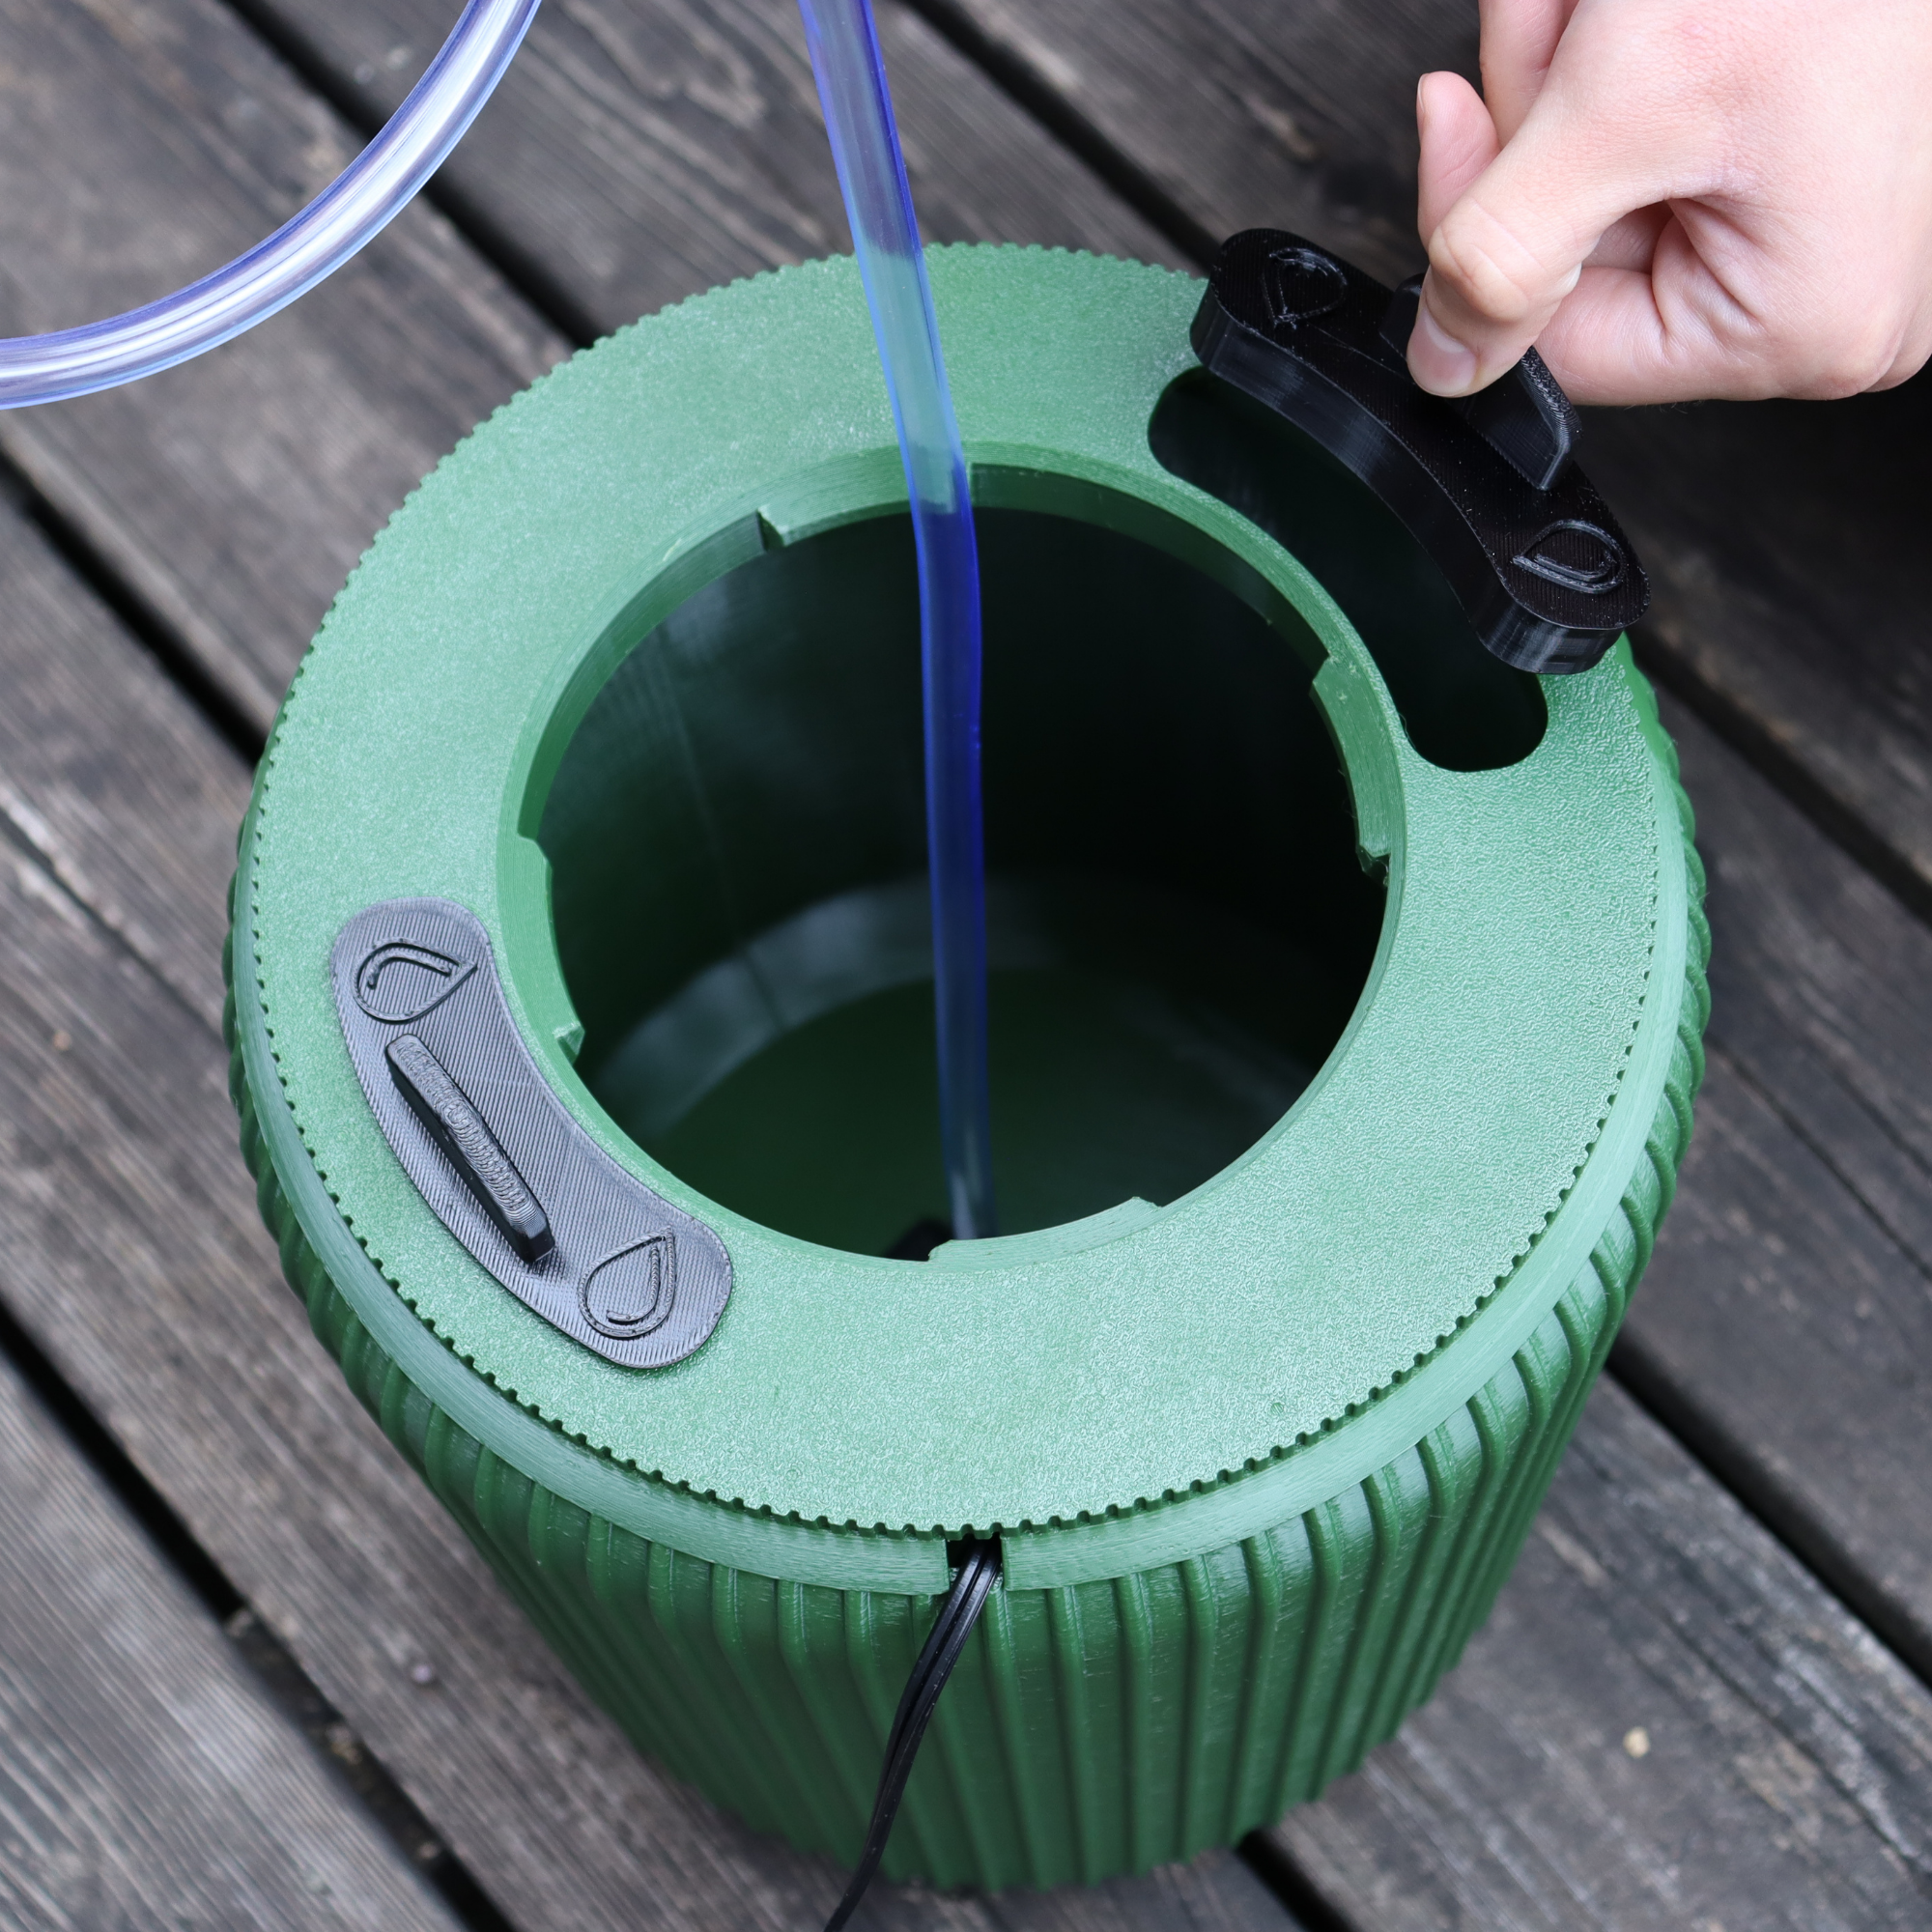
Stack the ClickFit Modules
Place your first ClickFit Module onto the reservoir cap and twist to lock it in. Add a Module Adapter on top, then repeat the process with all five modules and adapters. As you stack, continue threading the tubing upward through the center hole of each module to keep it aligned.
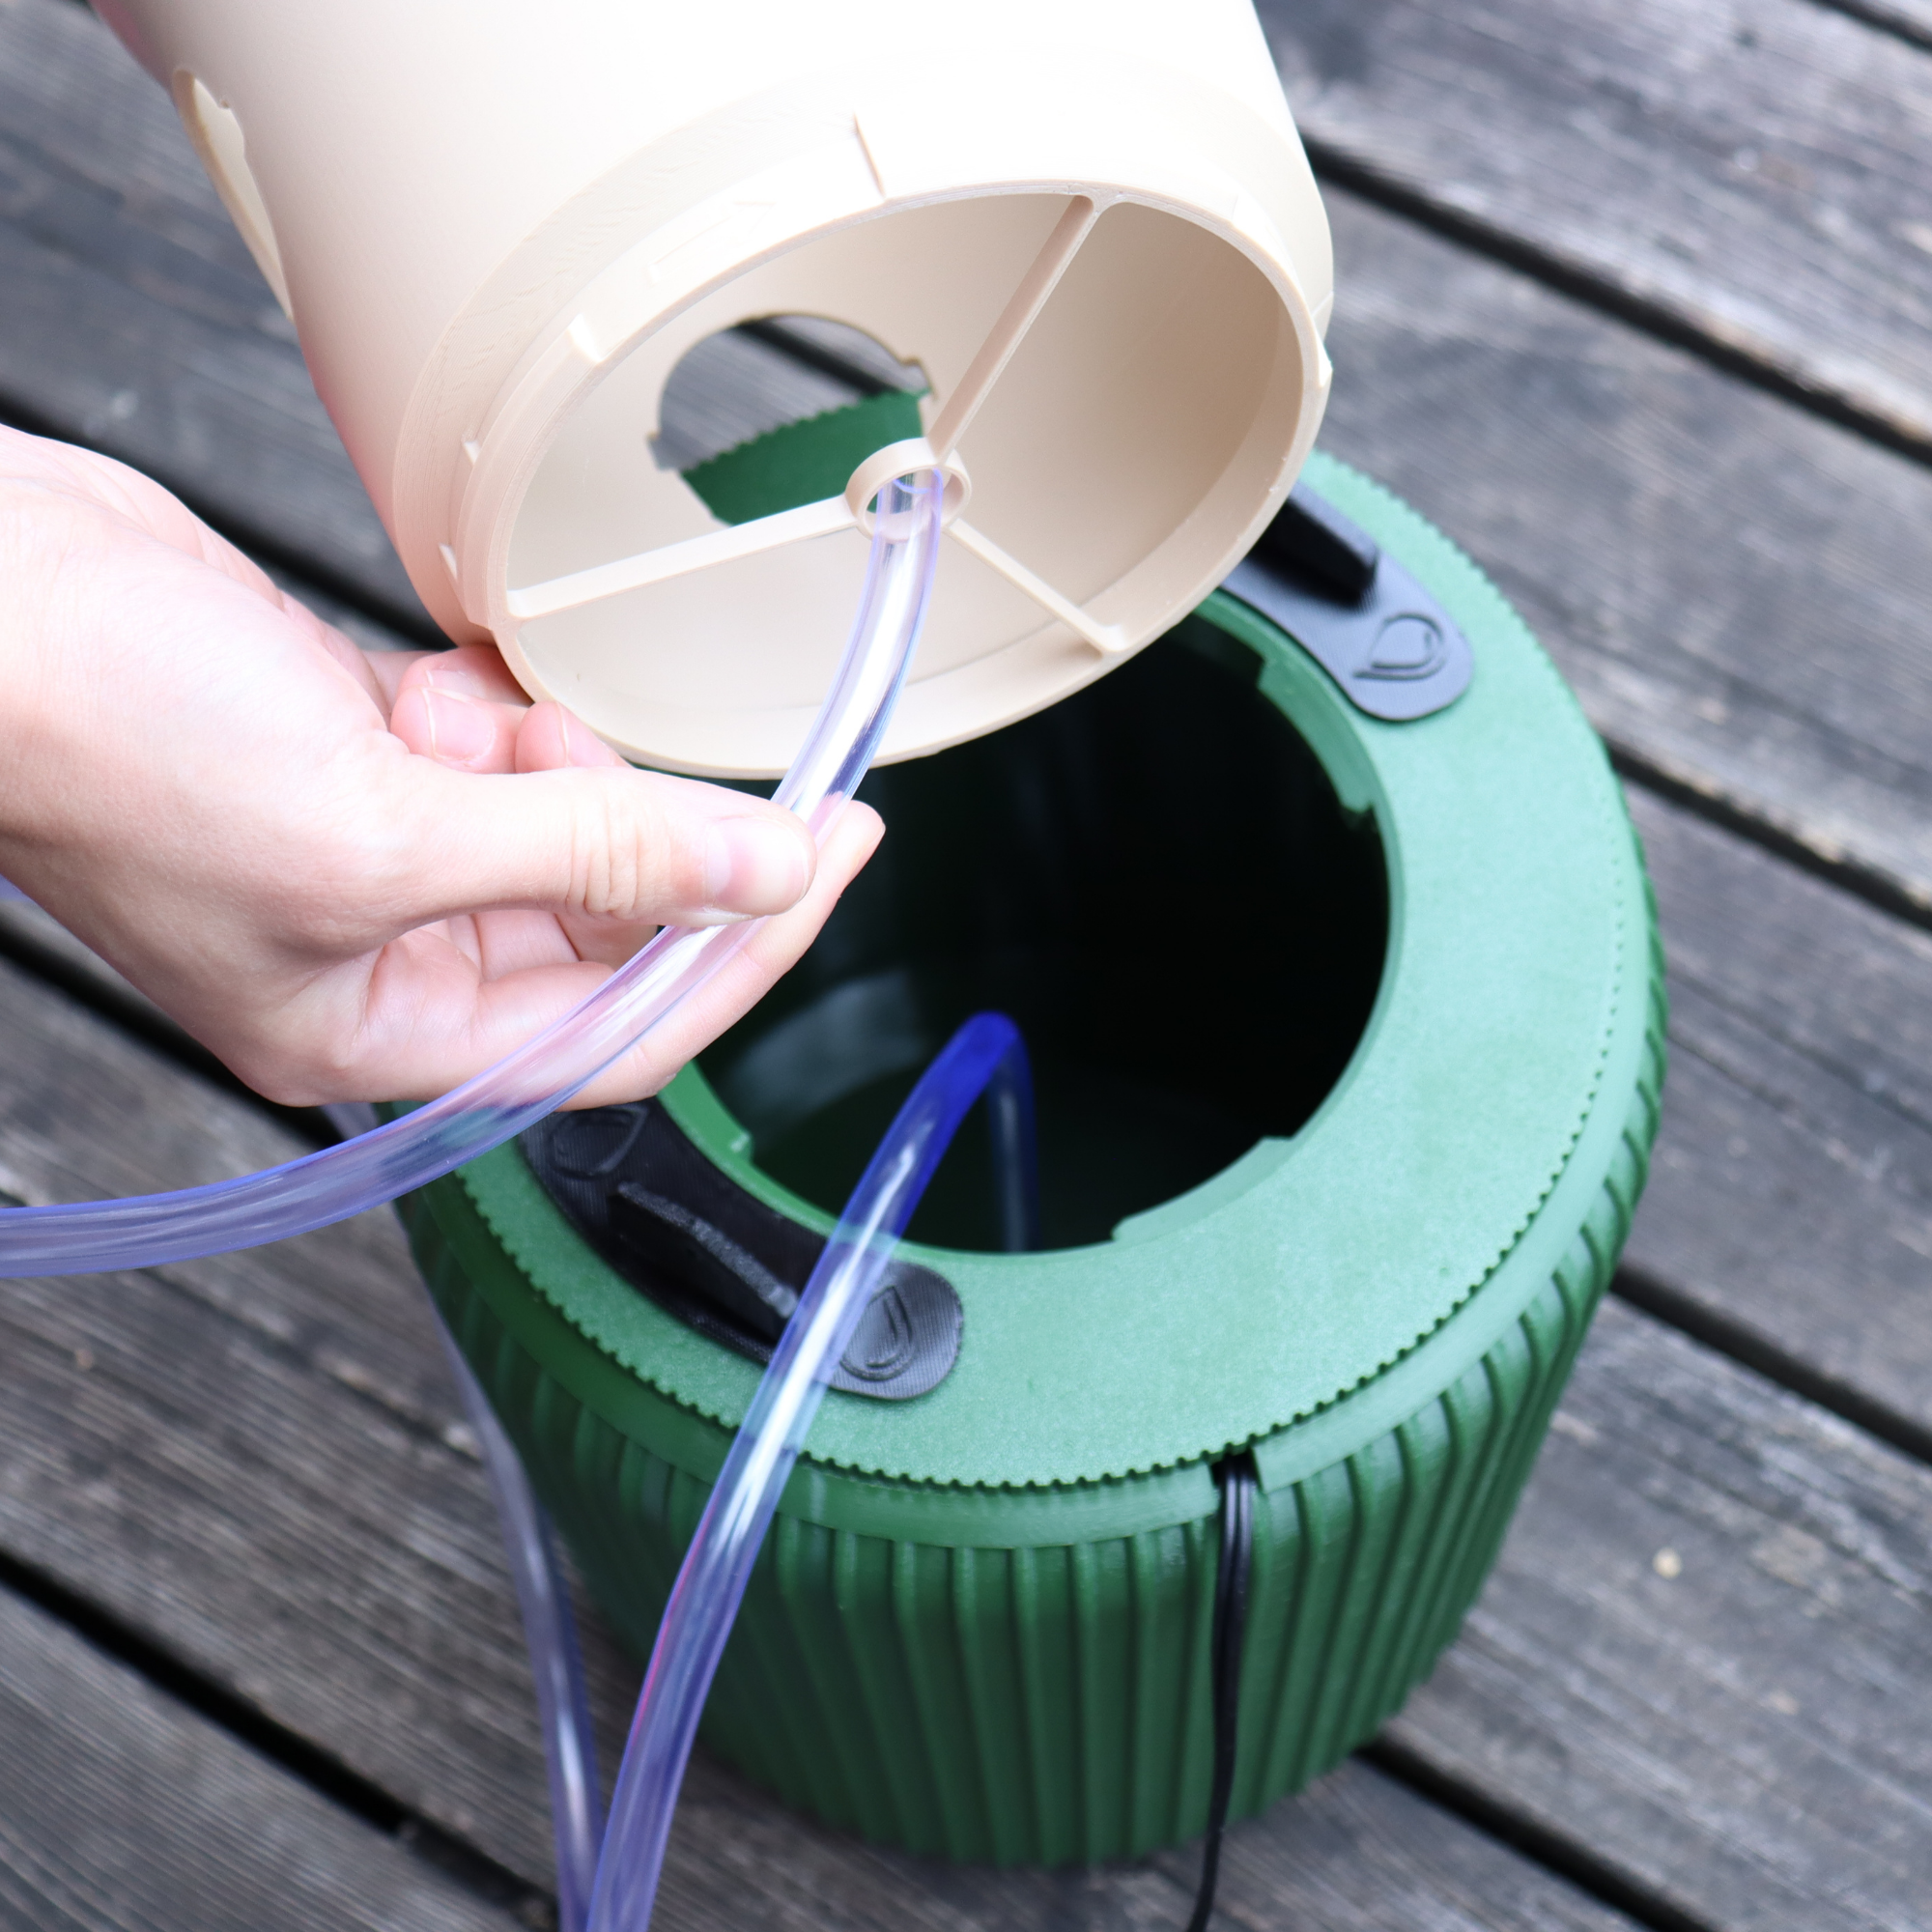
Continue Feeding the Tubing
Repeat this process as you add each new module — feeding the tubing through the Module Adapter before placing it onto the next ClickFit Module. Make sure the tubing remains centered and untwisted all the way to the top.
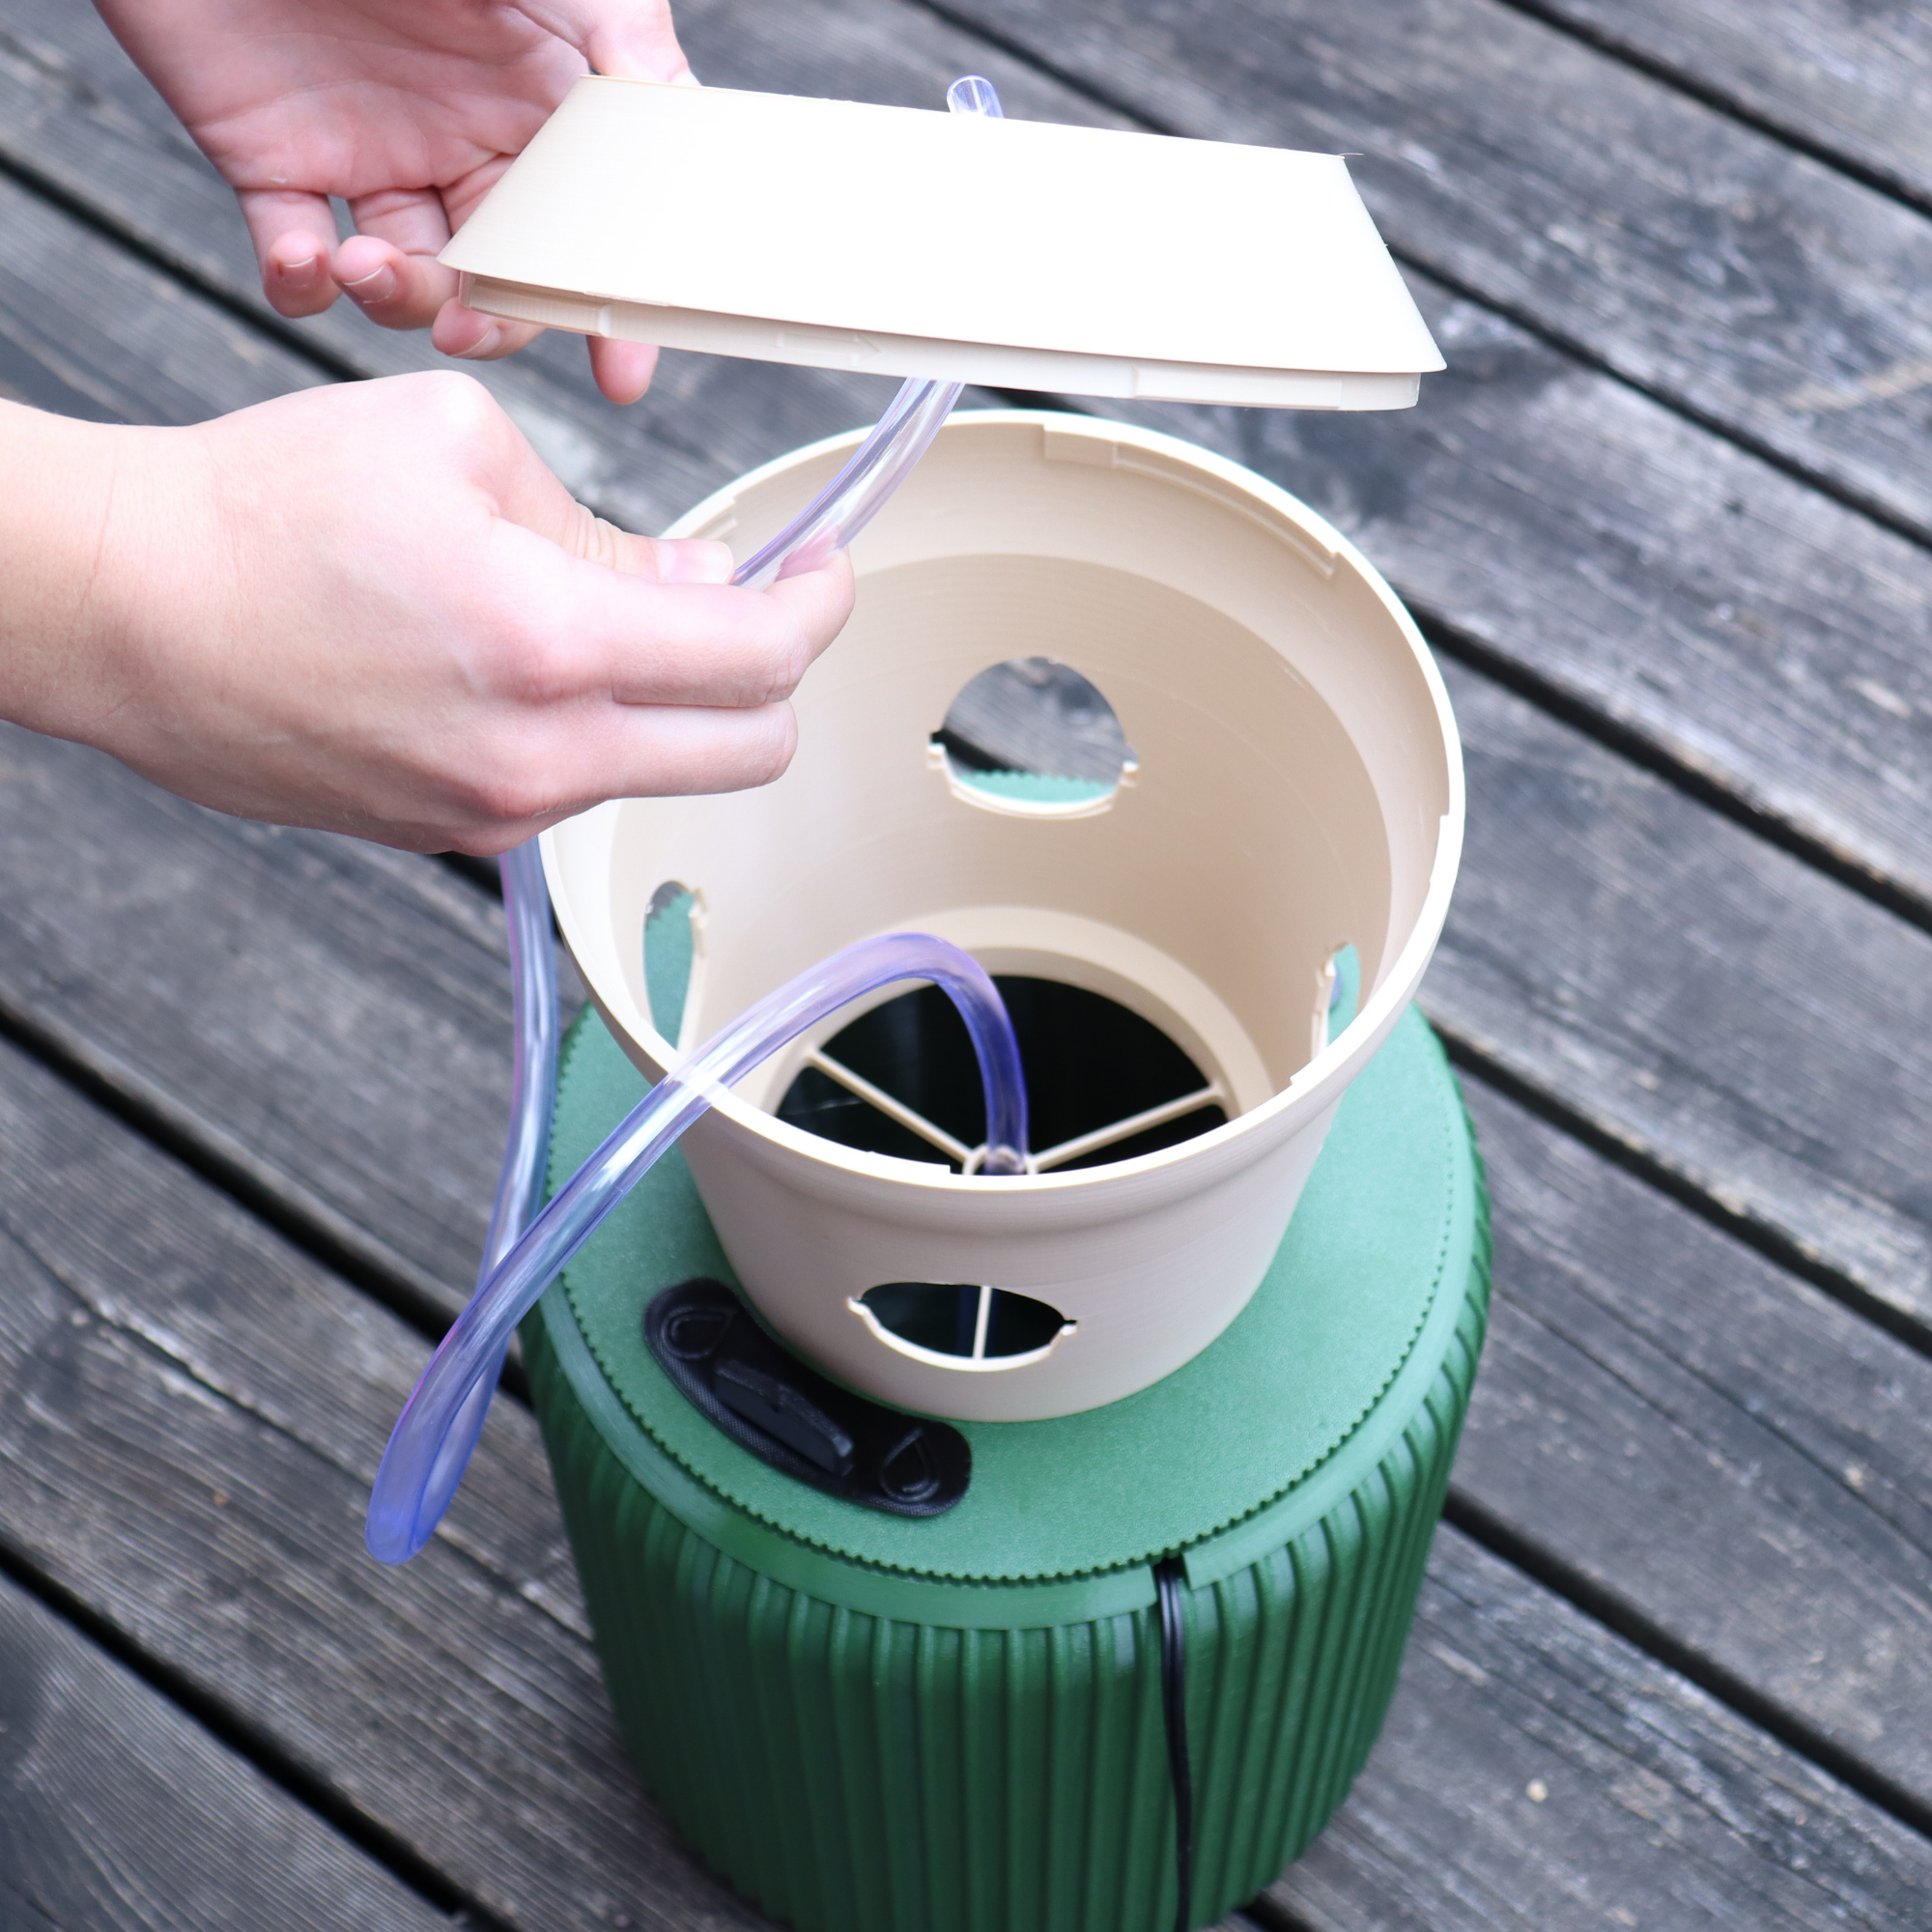
Connect the Top Dispenser
Once all modules are stacked, attach the tubing to the male connector on the underside of the top dispenser. Twist the feeder into place on the top module, then finish by placing the tower cap on top to keep the system clean and enclosed.
Insert the Plant Pod Adapters
Snap all 20 Plant Pod Adapters into the angled planting slots around each ClickFit Module. Align the tabs carefully and avoid applying too much force — pressing too hard can cause the small connection slots to snap. Each pod should click into place firmly but gently.
Assembly in Under 5 Minutes
Assembly Made Simple
Putting your tower together is simple and straightforward. Follow the step-by-step breakdown above or watch the full assembly video for a clear walkthrough.
The tower is designed to snap and stack securely, with only a few parts to connect. No tools are required — everything fits together quickly so you can start growing right away.
When installing the plant pods into the modules, remember not to use too much force. The angled slots are designed for a snug fit, but pushing too hard can snap the small tabs. That’s why we include 2 extra pod adapters in every kit — just in case.
No Tools Required
No Tools Required
No Tools Required
No Tools Required
No Tools Required
No Tools Required
No Tools Required
No Tools Required
No Tools Required
No Tools Required
No Tools Required
No Tools Required
No Tools Required
No Tools Required
No Tools Required
No Tools Required
No Tools Required
No Tools Required
No Tools Required
No Tools Required
Grow These Plants in Your Tower

Basil
Explodes in growth. Trim often to keep from crowding other plants. Best in lower tiers or near support ring.

Mint
Grows aggressively. Only plant one per tier or it may overtake others. Constant trimming recommended.

Cilantro
Slower start but rewards patience. Harvest all at once or allow to bolt and reseed.

Parsley
Slow to germinate but long-lasting. Snip stems from the base for continuous growth.

Oregano / Thyme
Compact and ideal for upper tiers. Drought-tolerant and easy to manage.

Chives
Thin, upright stalks. Easy to grow, harvest with scissors near the base.

Lettuce
Grows quickly and loves hydroponics. Harvest in 3–4 weeks. Perfect for top or middle tiers. Keep cool and avoid overcrowding.

Spinach
Prefers cooler temps; grows best in shaded lower tiers. Trim outer leaves to allow continual harvest.

Kale
Very hardy and high-yield. Can grow large, harvest outer leaves regularly.

Swiss Chard
Grows well but needs space. Use a support ring if planting multiple in the same tier.

Arugula
Fast-growing with a peppery bite. Harvest young for best flavor and to avoid bolting.

Bok Choy
Compact but water-hungry. Grows fast. Use lower tiers to keep roots cool and harvest early.

Strawberries
Perfect tower crop. Needs consistent watering and light. Expect fruit after 6–8 weeks. Likes the mid-tiers.

Cherry Tomatoes
Needs support and pruning. Best grown one per tier with a support ring. Keep away from leafy greens.

Small Peppers
Take longer to mature but grow well. Use support ring as fruit weight increases.

Ground Cherries
Compact, bushy fruit similar to cherry tomatoes. Can grow well in a tower with support.

Celery
Slow-growing but easy. Best in cooler climates. Requires trimming as it gets tall.

Green Onions
Grows easily in net cups and stays upright. Unlike regular onions, they don’t form large bulbs.


What crops grow best in the tower?
Lettuce, basil, mint, and spinach are great for beginners—they grow fast, are low-maintenance, and handle outdoor conditions well.
What crops shouldn’t I grow?
Avoid root vegetables like carrots, beets, onions, and potatoes—they need deep soil to develop properly. Also skip oversized or sprawling crops like squash, melons, corn, and full-sized tomatoes, which can outgrow the tower and become unstable. For heavier plants like chard, peppers, or small tomatoes, our plant support ring adds extra structure to keep them upright and stable.
How many plants can I grow?
The tower holds 20 plants (5 tiers) and can expand to 28 with more ClickFit Modules. The included pump supports up to 7 modules while keeping water flow steady.
How fast do plants grow?
Most greens are ready in 3–5 weeks. Herbs take 4–6 weeks, depending on conditions. Sunlight, water, nutrients, and temperature all affect growth speed.
Can I grow year-round outside?
Only if your climate stays between 15–28°C. Short dips to 10°C or peaks up to 35°C are fine, but extreme temps will slow or stop growth.
Start Here
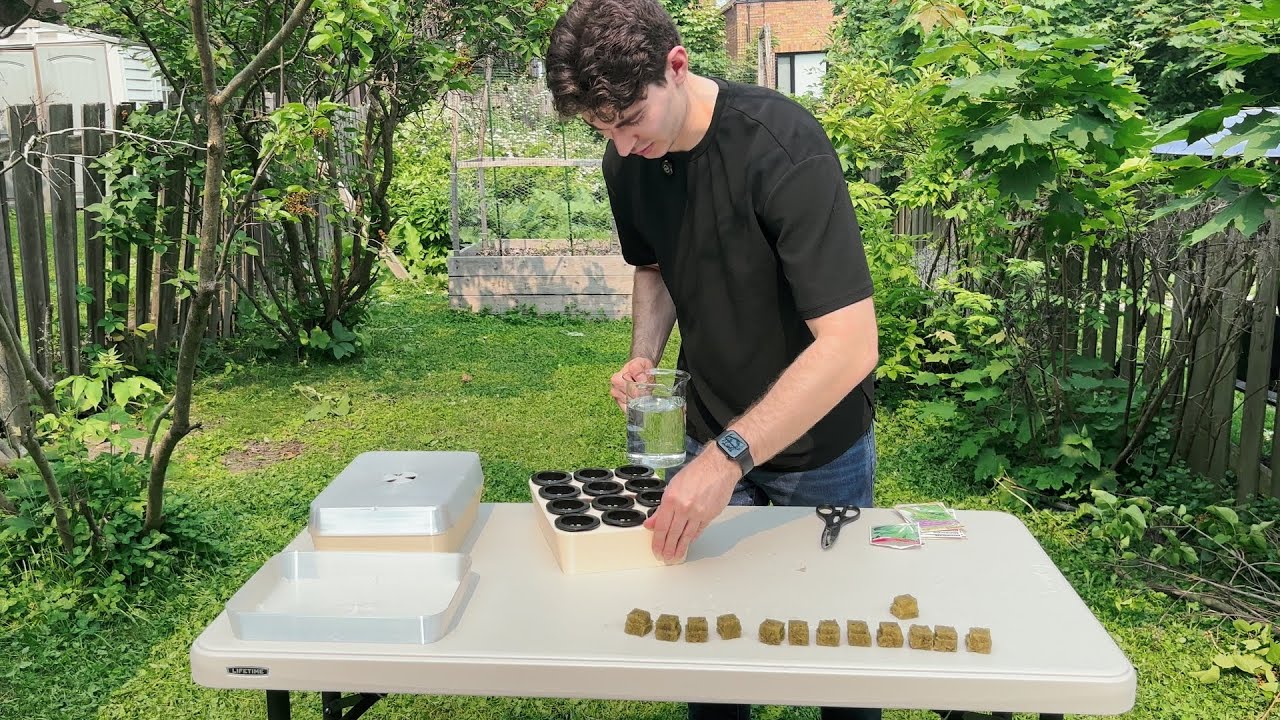
Start Strong with Germination
1. Soak your rockwool cubes in clean water (pH 5.5–6.5) for a few minutes.
2. Drop in one seed per cube and gently press them in — no need to bury.
3. Insert cubes into net cups, then place them evenly in the tray.
4. Fill the tray with water until it just touches the bottom of the net cups (about 5mm). This keeps the rockwool damp without submerging it. Use the two open corner holes on the tray to check the water level and refill when water is low.
5. Cover with the humidity dome to lock in moisture and warmth. Mist as needed.
Remove the dome once most seeds have sprouted and are showing true leaves — typically within 3–7 days. At this stage, the seedlings are ready to adapt to normal airflow and light. Each tray holds 12 net cups — great for small batches or as part of a two-tray setup to fill the entire tower (20–24 plants).
Sprout Smarter
Sprout Smarter
Sprout Smarter
Sprout Smarter
Sprout Smarter
Sprout Smarter
Sprout Smarter
Sprout Smarter
Sprout Smarter
Sprout Smarter
Sprout Smarter
Sprout Smarter
Sprout Smarter
Sprout Smarter
Sprout Smarter
Sprout Smarter
Sprout Smarter
Sprout Smarter
Sprout Smarter
Sprout Smarter
What kind of water should I use?
- Tap water is generally fine as long as it’s drinkable and not overly hard (high mineral content). If your tap water has high chlorine or chloramine levels, let it sit in an open container for 24 hours before use, or use a simple dechlorinator.
- Filtered water is a good middle ground—it removes excess minerals and chlorine without stripping everything like distilled.
- Distilled or reverse osmosis (RO) water gives you full control over nutrient levels but requires you to add calcium, magnesium, and other key minerals manually.
Unless you’re doing precision hydroponics, stick to clean tap or filtered water for the best balance of convenience and performance.
How often do I need to water the tower?
The tower waters itself by circulating from base to top. Over time, water drops from evaporation and dripping. Use the built-in level markings and top up when it falls below the 3-gallon line to keep the pump running properly.
Should the pump run all the time?
No—you don’t need continuous circulation. For best results, connect the pump to a timer or smart plug and set it to run 15 minutes every hour (15 on, 45 off). This provides more than enough water and oxygen to your plants while reducing wear on the pump, conserving power, and minimizing heat buildup in the reservoir.
Mix It Right
Mixing Nutrients and Adjusting pH
What nutrients should I use?
Use a hydroponic-specific mix like Grow, Micro, and Bloom. This 3-part system gives your plants the full range of macro and micronutrients throughout their life cycle. Never mix the three together before adding to water — this can cause nutrient lockout.
How do I mix and measure nutrients?
Check the dosage instructions on each bottle — most list amounts in mL per Liter or mL per Gallon. For a 3-gallon (11–12 L) reservoir, multiply the per-gallon dose by 3. For example, if the label says 4 mL per Liter, that’s about 15 mL per gallon, or 45 mL total for 3 gallons.
1. Add Micro first. Pour it in, and run the pump for 1–2 minutes.
2. Add Grow next. Then run the pump again for 1–2 minutes.
3. Add Bloom last. Run the pump one final time for 1–2 minutes to fully mix everything.
4. After all nutrients are added and mixed, measure and adjust pH.
Micro, Grow, Bloom
Micro, Grow, Bloom
Micro, Grow, Bloom
Micro, Grow, Bloom
Micro, Grow, Bloom
Micro, Grow, Bloom
Micro, Grow, Bloom
Micro, Grow, Bloom
Micro, Grow, Bloom
Micro, Grow, Bloom
Micro, Grow, Bloom
Micro, Grow, Bloom
Micro, Grow, Bloom
Micro, Grow, Bloom
Micro, Grow, Bloom
Micro, Grow, Bloom
Micro, Grow, Bloom
Micro, Grow, Bloom
Micro, Grow, Bloom
Micro, Grow, Bloom
What pH level is ideal?
Keep your nutrient solution between pH 5.5 and 6.5. This slightly acidic range supports optimal nutrient absorption for most herbs, leafy greens, fruiting crops, and overall healthy root development.
How to adjust pH?
Use a digital meter or test kit. After adding nutrients, adjust slowly, stir, and re-test. Check weekly or more often if growth seems off.
- If pH is high: add pH Down
- If pH is low: add pH Up
When to add nutrients?
Every 2-3 weeks: Fully drain and refill your reservoir with fresh water and nutrients to maintain balance.
Don’t re-dose nutrients with every water top-up — this can over-concentrate and stress plants.
Outdoor Placement & Conditions
Set your tower up for success
Does it need full sun or partial shade?
Most plants grow best with full sun, but some (like lettuce or herbs) can thrive in partial shade. If you’re in a very hot climate, giving your tower a bit of afternoon shade can help prevent water overheating and reduce stress on your plants.
Most plants grow best with full sun, but some (like lettuce or herbs) can thrive in partial shade. If you’re in a very hot climate, giving your tower a bit of afternoon shade can help prevent water overheating and reduce stress on your plants.
Where should I place my tower outdoors?
Choose a flat, level surface with good sunlight exposure — ideally 6 to 8 hours of direct sun per day. A patio, balcony, deck, or driveway are all excellent choices. Avoid placing the base directly on grass or soil. If you’re setting up on a lawn or dirt, place a cement block, paving stone, or sturdy piece of wood under the base. The most important step is making sure that surface is completely level — if a stone or paver tilts even slightly, the water flow inside the tower will run off to one side instead of dropping straight down, and some plants may not receive enough water.
Can it stay outside during rain or storms?
Yes, the system is designed for full outdoor use. Rain won’t harm it, and the components are made from UV-resistant PETG and weather-rated parts. That said, heavy wind or hail can damage plants or knock the system over if it’s top-heavy—placing the base against a wall or corner can help add stability.
How to protect the tower during extreme heat or cold
- In extreme heat (above 35°C / 95°F), try to keep the base shaded or cool the water with early morning top-ups.
- In cold snaps (below 10°C / 50°F), growth will slow significantly.
- If freezing temperatures are expected, drain the system and remove the pump to prevent damage.

What’s the ideal temperature and humidity range for growth?
- Temperature: 15°C to 28°C (59°F to 82°F) is optimal
- Tolerable range: 10°C to 35°C (50°F to 95°F)
- Humidity: 40% to 70% is ideal for most leafy greens and herbs
- Extremes outside these ranges may cause slowed growth or plant stress, but short-term dips or spikes are usually fine.
Keep your tower running smoothly with these quick tips and fixes.
Maintenance & Troubleshooting
Tower Cleaning
Water Flow Issues
Plant Health & Growth
Beginner Tips
How often should I clean the tower?
You should clean the tower thoroughly after each grow cycle, before starting a new round of planting. This keeps the system sanitary, prevents algae buildup, and avoids cross-contamination between crops.
How do I clean the water reservoir and pump?
- Drain the reservoir using the pump and vinyl tubing as described in the Watering section.
- Remove the base lid and take out the pump.
- Rinse the reservoir with clean water. You can use a soft sponge if there’s buildup.
- For deeper cleaning, fill the reservoir with a 1:10 vinegar-to-water mix and run the pump for 10–15 minutes, then rinse thoroughly.
- To clean the pump, remove the front cover and rinse the impeller area under warm water.
What should I use to clean safely?
Use white vinegar or 3% hydrogen peroxide for regular cleanings—both are safe, effective, and plant-friendly. Avoid bleach or harsh cleaners that could leave toxic residue.
Why is the water not flowing properly?
This could be caused by:
- A kink or blockage in the vinyl tubing
- A disconnected or misaligned tube at the pump or dispensary
- A clogged pump (often from debris or algae buildup)
- Low water level in the base causing the pump to suck air
What to do if roots clog the pipes?
Roots can grow into the tubing path over time, especially in fast-growing plants. To prevent this:
- Trim excess roots during regular maintenance
- Avoid planting aggressive root systems in the top modules
- If blocked, remove the top cap, disconnect the tubing from the dispensary, and flush it with clean water or gently clear the clog with a pipe cleaner or soft wire
Why are plant leaves yellowing?
Most common reasons:
- Nutrient imbalance or deficiency (check your nutrient ratios and top-up schedule)
- pH out of range (test and adjust)
- Water temperature too high (shade the base or top up with cool water)
- Overcrowding or poor air circulation
How to prevent mold, algae, or pests
- Keep the system in full sun or good airflow to reduce moisture buildup
- Avoid letting water sit stagnant
Clean your system regularly (especially the reservoir and tubing) - Use net cups with tight-fitting rockwool to limit light exposure to water
- If pests show up, remove affected plants and spray nearby ones with a mild natural insecticide (like neem oil or diluted soap solution)
Common beginner mistakes to avoid
- Overloading the tower with too many different plants on your first grow
- Not monitoring water levels regularly (keep above the 3-gallon mark)
- Skipping pH checks — this is one of the biggest reasons for poor growth
- Using the wrong nutrients (always use hydroponic-specific formulas)
- Letting roots get out of control without trimming
- Ignoring buildup of algae or debris in the reservoir
Tips to improve success on your first grow
- Start with easy, fast-growing crops like lettuce, basil, or mint
- Use a pump timer (15 minutes on, 45 off) to optimize root oxygenation
- Top off the reservoir with cool water during hot weather
- Check pH once a week, especially after adding nutrients
- Keep your grow area clean, well-lit, and free of standing water
How to avoid overcrowding plants
- Don’t plant all 20 sites at once with large leafy crops — space them out
- Use support rings for heavier plants like bok choy or mature lettuce
- If leaves start shading lower plants, trim regularly to allow light flow
Grow Smarter with ClickFit Tutorials
How to Germinate Seeds for Your Hydroponic Tower
Follow our simple germination process using rockwool cubes to start seeds strong before transferring to the tower.
Unboxing the ClickFit Outdoor Hydroponic Tower Kit: What’s Inside
See everything included in the ClickFit Hydroponic Tower Kit and how each part fits into the system.
How to Assemble the ClickFit Outdoor Hydroponic Tower Kit
Learn how to quickly assemble your ClickFit Hydroponic Tower step by step — no tools required.
Mixing Nutrients & Adjusting pH
Learn how to mix and balance your hydroponic nutrients for faster, healthier plant growth in your Stack Gardens Tower.
How the Stack Gardens Hydroponic Tower Works
Discover how the ClickFit Tower circulates water and nutrients to every plant automatically — no soil or guesswork needed.